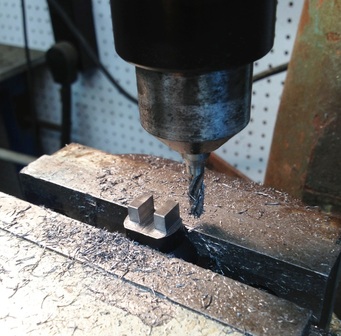
Claw feet roughed out on a Leupold high ring for my Merkel BBF 7x57R 16 ga.
Claw type scope mounts.
The European style claw type scope mounts have been popular there for generations. The Germans refer to them as "Suhler Einhakmontage" or simply (SEM) mounts. They are, in my mind, the best mounting system for a drilling or combination gun. They’re solid, and return to zero every time if properly fitted. The scope comes off, and goes on, instantly with one hand even in the dark. So, why aren’t they used on more guns around the world these days? The answer is simple. They are expensive and require a lot of hand fitting. Even the Europeans have gone more to the swivel mounting systems. They are universal. As with most things, it comes down to cost. Even the newer drillings are mass produced with bulky receivers, milled out on computer controlled equipment with monobloc designs that require much less labor and fitting to complete, and alloys to help cut weight. I prefer the old style slimmer guns that were hand made, regulated carefully and fitted. I also like claw scope mounts and have made some rings for them over the years. Most older drillings & combination guns have claw bases already installed. So the task is to find or make and hand fit the claw type rings. EAW is a company that makes "blank" rings with the feet already machined that are then shaped and fitted to the bases. They are made in various sizes to fit the more popular bases. They also make rings to fit the objective rings on scopes. http://www.newenglandcustomgun.com/Gun_Services/Scope_Mounts.asp The drawback of claw mounts is they must be lifted up from the back, which rules out tube mounted front rings on large objective scopes. I prefer smaller power scopes for these guns and exclusively use straight tube objective scopes like the Leupold VXIII 1.5-5X or the Burris 1.5-5X. The adjusting turret on the Burris is a little farther forward which can sometimes be needed, depending on the base location. The Burris is also longer.
I have made the rings out of 1" high or extra high US rings like Leupold. You just need to make sure there is enough metal there for the size openings in your bases. If not, you can have some welded on, but that entails more work & expense. You might also be able to match an extension type ring up with your claw mount project.
Other bases might be too far apart to make the rings work and might need an extension type ring that requires the ring to be slotted, and welding or silver soldering a steel bar in that can be milled into your "feet". Determine how your scope needs to be mounted on your bases by checking the eye relief and the base locations.
The photo shows a Leupold high ring that I milled for a set of claw "feet". Measure the openings in your bases and mill the feet to match, leaving @ .005 on all sides for file fitting. You could make the rings with just a file, but it would be very labor intensive and probably not as precise. Most people know a machinist or someone who has a shop that can do it. The small hobby mills work fine. Be sure to keep everything centered to the middle of the ring. There is some windage adjustment you can do by drifting the front base to compensate for small out of alignment corrections.
Once you have your feet roughed out, go ahead and start shaping them and fitting them to the slots. I use blue engineers paste to get a firm slip fit into the slots. Be sure to keep everything aligned front to back & centered. Once you get there, start shaping the front hooked claws. If you don’t have a set, you can look at, get a picture of them up close and copy the design while fitting them to your bases. I use a piece of 1" OD, tubing with the ring clamped on as I work. Don’t use your scope. Take your time and work the feet down into the base using the blue paste to spot contact areas and taking off a tiny bit at a time. I use a small fine flat file that I ground a "safe" side on one edge for this. A good set of needle files is required for shaping the claws. You can also wrap fine emery paper on you files (600) for the final finishing "cuts". You want to finish the front hooks with a little spring tension left before the tube comes level for the rear. This ensure a solid mounting. The base of the ring around your feet should sit solidly on the top of the base. When you finish with the front, start on the rear. It’s good to take the rear slider off the base (careful not to lose the spring & parts) and then fit the solid feet to the base, before you shape the claws that the slider engages. You also need to look at the bevels for having the claws slide into the base and for clearance. On combo guns, the bevel is in the inside of the feet and drillings it’s on the outside to fit down between the barrels. You will also have to bevel the feet in front & back to make them angle into the bases. Leave as much metal as you can for strength. You are coming to the critical part, so go slowly and with the slider in place, continue to work the notches with full contact on the slider bottom surface (top of the notch in the claw). It should settle down snugly on the top of the base and hold the ring solidly in place.
Now just apply some cold blue or rust blue the rings the way the old masters did and you are finished. It’s a time consuming and tedious job, but the end result is well worth it. Even if you have to throw one or 2 attempts away in the learning curve, pick up some more rings on Ebay & don’t worry about it. I no longer do this work for customers, as it’s hard on my old back, eyes and hands, but I’ll be happy to answer questions on your project.
Greg
 Gary Fatheree photo
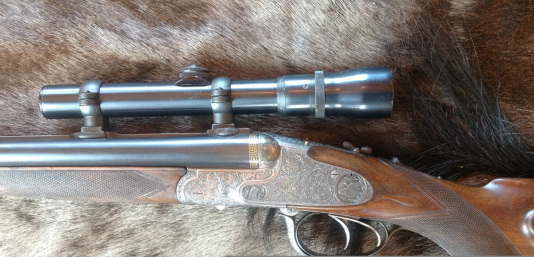
This claw mount was made by a fellow drilling enthusiast, who is not a gunsmith or machinist. Notice the "feet". The slots in the bases were wider than the scope ring lower metal, so he made the feet out of steel blocks and attached them to the rings. Nice work!
 Gary Fatheree photo
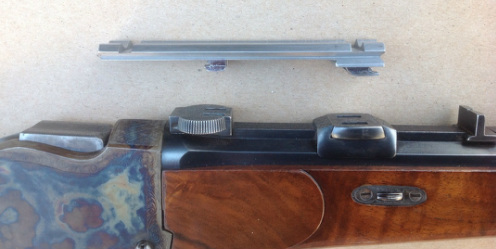
Another approach is this nice rail arrangement by the same craftsman. He machined a Weaver type rail with fixed claws. This works well for larger objective scopes and allows more flexibility in ring placement using QD style rings.
